Converting Search Hits into Annotations
You can use the search function in PDF Annotator to find all instances of a word or phrase in the opened document. You might want to make a special annotation for all or some of the instances of that word or phrase for illustrative purposes or to underline to one or more of them.
PDF Annotator makes this easy and efficient to do with the improved search function. The search text box is located at the bottom of the screen. If it is not showing, there are several ways to make it appear.
- You can click on the Edit menu option and scroll down to Find... and it will become available.
- You can click on the binoculars icon on the main toolbar, or
- You can use the key combination, Ctrl + F.
![]()
Type your query into the search box. If you type a phrase, it will normally wait until you are finished typing to display the results. However, if you pause between words, the search will start immediately. But as you continue typing, the search results will adjust to the completed phrase. You will not need to start over.
Search Options
Now that the search feature is visible, you will notice that you have several options for the search parameters. The option is highlighted in blue when it is turned on. Click on the option to turn it on or off. You may use more than one option for the search parameter.
-
Match Case – this option forces the case of the words or phrase to be an exact match.
For example, if Match Case is turned on and the phrase entered is
content marketing, then the phraseContent Marketingwould not be included in the search results. -
Whole Word Only – This option forces the search results to include only the instances where the full word
or
phrase is available.
For example, if the search word is
market, then the wordmarketingwill not be included. If this option is turned off, bothmarketandmarketingwould be found, but with onlymarkethighlighted in the search results. -
 Highlight All – This option highlights all of the words found for the search word or phrase.
You will notice that the first instance is highlighted in green,
with subsequent instances in yellow.
However, clicking the Up or Down buttons next to the search text box will move the green
highlighting
to the next word in the series of results.
If the option is turned off, then the first found instance will be highlighted in green. Again, clicking the arrow buttons will move the highlighting to the next instance of the search result.
Convert into Annotations
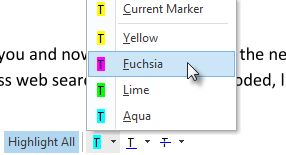
Note that these highlighted colors are not annotations and, therefore, are not permanent. However, there is a way to mark some or all of them with one of three different markups:
-
 Marker – You can use either the current marker color or choose from one in the pop up menu.
- Underline – You can use the current pen color and style or choose a different one.
-
Strikeout – You can choose the current pen option or choose another one.
If you have Highlight All chosen, then you can apply the markup to all search results at once. For example, should you choose a marker color of yellow then all instances of the search result will be highlighted in yellow.
If you only want to highlight certain instances, then deselect the Highlight All and you can use the arrow buttons to select the instance that you want to markup.
Once you are finished with the markup, you can save the document and the markup annotation will be saved with it. They will remain editable and can be removed when the PDF is opened again.
You can remove all of the annotations at one time by clicking on the Remove All Annotations selection under the Edit menu. If you want to make them permanent, choose Melt All Annotations and the markup annotations will no longer be editable.
You may also remove individual markups by selecting them with either the Eraser tool, or the selection tool and pressing the Delete key.